
If the system administrator deliberately filters out all traffic except port 22 (ssh), to a single server, it is very likely that you can still gain access other computers behind the firewall. This article shows how remote Linux and Windows users can gain access to firewalled samba, mail, and http servers. In essence, it shows how openSSH and PuTTY can be used as a VPN solution for your home or workplace, without monkeying with the firewall. This article is NOT suggesting you close port 22. These step are only possible given valid accounts on all servers. But, read on, you may be surprised what you can do, without punching additional holes through the firewall -- punching additional holes is a bad idea.
OpenSSH and Linux
From the Linux laptop 192.168.1.106, it is possible to get access to the resources behind the firewall directly, including SAMBA server, HTTP Server, and Mail Server which are blocked from the outside by the firewall. The firewall only permits access to the SSH Server via port 22; yet, as you will see, it is possible to get access to the other servers.

The SSH Server is seen as 66.35.250.203 from the outside. To tunnel traffic through the SSH Server, from the Linux laptop 192.168.1.106, create the following "~/.ssh/config" file, on the Linux laptop.
~/.ssh/config
## Linux Laptop .ssh/config ##
Host work
HostName 66.35.250.203
        User sporkey
        LocalForward 20000 192.168.0.66:80
        LocalForward 22000 192.168.0.66:22
        LocalForward 22139 192.168.0.8:139
        LocalForward 22110 192.168.0.5:110

Host http
HostName localhost
        User donkey
        Port 22000
        HostKeyAlias localhosthttp
This file must have the following rights.
$ chmod 600 ~/.ssh/configTake a look again at the file above. Note the entry for "LocalForward 22000 192.168.0.66:22", and compare this to the network diagram. The connection to the SSH Server is made by running the command below, from the Linux laptop (192.168.1.106).
$ ssh -l sporkey 66.35.250.203Quick hint: the above command can be shortened, since the user name "sporkey" and the "HostName" are already specified in the config file. Therefore, you can use "ssh work" as shown below.
$ ssh workAfter this connection is made, it is possible to access the HTTP Server directly, assuming the account donkey has access to this server. The following command below is executed on the Linux laptop (192.168.1.106). Yes, that is on the Linux laptop in a new window. Again, this will be executed from 192.168.1.106 in a new session. So note here the Linux laptop is getting direct access to (192.168.0.66). Reference the diagram above. This is the "localhost" of the Linux laptop -- you got this, right? The ssh sessions are initiated from the Linux laptop.
$ ssh -l donkey localhost -p 22000Since the config file maps "http" to localhost port 2200, the above command can be shortened to the following:
$ ssh httpWait, there is a better way. Instead of creating two terminal sessions, one for "ssh work", then, another one for "ssh http", why not put it all together in one command.
$ ssh -N -f -q work;ssh httpThe above command will establish the connection to work, forwarding the necessary ports to the other servers. The "-N" is for "Do not execute remote command", the "-f" requests ssh to go to the background, and "-q" is to suppress all warnings and diagnostic messages. So, still not short enough for you? Then create an alias, alias http='ssh -N -f -q work;ssh http' and put that in your "~.bashrc" file, which is about as short as you can get, since typing http on the command line would get you to the HTTP server.
To copy files to this server, the command below is used. Note uppercase "-P" follows "scp". If you are in the ".ssh" directory you will see an "authorized_keys2" and maybe an "authorized_keys", which you may want to append to the like files on the destination server. These files are only listed as an example. Any file could be copied; but, if you copy these files to the remote server and append the contents to the remote server's authorized_key* files, then, you will not be prompted for a password the next time you make a connection. See Tip 12 in Linux Tips. You will need to create an authorized_keys2 and authorized_keys file with all the public keys of the computers that will connect. Below, assume you have these keys in the currently directory on the laptop, and you want to copy this to the HTTP Sever [192.168.0.66]. The keys go in "~/.ssh/authorized_keys2" for ssh2. Again, take a look at Linux Tips . You do not want to write over any existing keys.
$ scp -P 22000 authorized_keys* donkey@localhost:./.ssh/.But, because you have everything in the "config" file, you can shorten the above command to the following:
$ scp authorized_keys* http:./.ssh/.The following command, executed from the Linux laptop, will download the web page from the remote server (192.168.0.66).
$ wget http://localhost:20000/Linux Laptop becomes Company Web Server -- Power of RemoteForward
Suppose the Linux laptop is running a web server. Is it possible for the people in the company to view this, the web server on the laptop (192.168.1.106), when they attach to HTTP Server (192.168.0.66)? Absolutely. Think about this because what is being suggested here is that a laptop, with no direct access to the HTTP server, is actually going to take over the company web server. Yes, that is exactly what will be shown here; although, instead of taking over the company web server, which is running on port 80 of (192.168.0.66), you will see how to add an additional web server on port 20080. However, if you are intent upon taking over the company web server, you would have to perform similar steps as root, since only root has the ability to take over the privileged ports. But, start with this example first, then, you'll see how to do this on port 80. To perform this magic, the "/etc/ssh/sshd_config", on the company web server (192.168.0.66), must have the variable "GatewayPorts" set to "yes", otherwise, only the users logged into HTTP Server will be able to see the laptop's web page. Instead, we want everyone in the company to have direct access to the added port.
GatewayPorts yesAfter making the change, you will need to restart sshd.
$ /etc/init.d/sshd restartIn the Linux laptop's "~/.ssh/config" add the following entry RemoteForward 20080 localhost:80 so that the complete "~/.ssh/config" is shown below.
## Updated Linux Laptop .ssh/config  ##
Host work
HostName 66.35.250.203
        User sporkey
        LocalForward 20000 192.168.0.66:80
        LocalForward 22000 192.168.0.66:22
        LocalForward 22139 192.168.0.8:139
        LocalForward 22110 192.168.0.5:110

Host http
HostName localhost
        User donkey
        Port 22000
        RemoteForward 20080 localhost:80
        HostKeyAlias localhosthttp
If you perform a "netstat -l" from 192.168.0.66, the remote company web server, you should see the following:
tcp 0 0 *:20080 *:* LISTENThis means that anyone, in the company, can view this webpage http://192.168.0.66:20080/ on port 20080. If you wanted port 80, the default http port, the connected user would have to have root privileges.
If you did not change the "/etc/ssh/sshd_config" file, "GatewayPorts" defaults to "no". And executing a "netstat -l" (that's an ell), would return the following:
tcp 0 0 ::1:20080 *:* LISTENWith the above restrictions, only users on the computer 192.168.0.66 would see the webpage on 192.168.1.106 from port 20080. This is what happens by default, since "GatewayPorts" is set to no.
By the way, did you figure out what the HostKeyAlias command does? If you make multiple localhost entries in your config file without HostKeyAlias, .ssh/known_hosts will contain multiple entries for "localhost" with different keys. Try it without HostKeyAlias and it should bark at you.
For references on generating ssh key pairs, securing an ssh server from remote root access, and samba mounts through an ssh tunnel see (TIP 12, TIP 13, and TIP 138) in Linux Tips listed at the end of this article. In addition,if you are a system administrator, may want to take note of (TIP 14), keeping yearly logs, and (TIP 26), which shows how to kill a user and all their running processes. In addition, the following (TIP 10, TIP 11, TIP 15, TIP 24, TIP 47, TIP 52, TIP 89, TIP 104, TIP 148, and TIP 150) may help with system security.
PuTTY for WindowsXP
From your Windows XP laptop, you want access to the following resources behind a firewall "SSH server", "Mail Server", and "HTTP Server". The only port allowed in is ssh, port 22, to the "SSH Server". So, how do you get access, from the laptop to the other resources using an ssh tunnel?

Step 1: (Download PuTTY)
Download putty.exe and plink.exe. Although plink.exe is not needed, it provides some handy features you may end up using later.
I normally put the files in "c:/bin", then, add this directory to the path.
Step 2: (Load the IP Address of Your Server)Substitute the IP address 66.35.250.203 for the IP address of your ssh server and save it. Note 66.35.250.203 really is sourceforge, so unless you're access projects on sourceforge, you probably want a different IP address.

Step 3: (Create the Necessary Tunnels)
There are 2 additional servers you need access to. The "HTTP server" 192.168.0.66, and "Mail server" 192.168.0.5. Click on Tunnel and fill in the following values. The HTTP server works on port 80, so enter 80 in the Source port. The destination is 192.168.0.60:80. Hit "Add" to commit this entry.
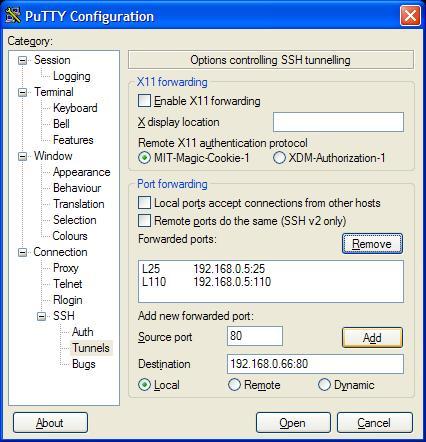
Your listing should be similar to the following. Make sure each entry has an "L" listed in front of it. Local port 25 will now go to server 192.168.0.5 on port 25. But, ports 110 and 25 will go to server 192.168.0.5.

Step 4: (Testing the Connection)
If you now open your ssh connection, click on "Sourceforge", or whatever you name it, then, you can browse the data on the "HTTP Server" by filling in local host at the browser. It makes sense to "Check" the connection at this stage -- remember to put in the correct IP addresses for your server.

Step 5: (Setting up Mail)
Mozilla Thunderbird is an excellent mail package. It will work in place of Microsoft Outlook, when connect to your work's Exchange, Postfix, or Sendmail server.
The server location is localhost. And notice the option below to "Leave messages on server". If you have another email client on your workstation at work, then, you might want to keep the mail on the server.

Step 6: (Getting Access to Samba Shares -- Loopback Adapter)
From the Windows XP computer, you want to add a Micosoft loopback Adapter. From the control panel, follow the steps below. By the way, it is possible to add more than one adapter.
1.  Yes, I already connected the hardware
  2.  Add a new hardware device (bottom of menu)
  3.  Install the hardware that I manually select from a list (Advanced)
  4.  Select Network Adapters
  5.  Micosoft Loopback Adapter
Once the adapter is added, you must assign an IP address. The first adapter will be assigned 10.0.0.1, the second will be assigned 10.0.0.2, etc. DO NOT enter a "Default gateway".

The second adapter will have the IP address 10.0.0.2. Remember, there are two samba servers in the network diagram. Both the HTTP server and the SAMBA server have samba shares. Again, DO NOT enter a "Default gateway".

The loopback Adapters should appear in the control panel

Step 7: (Getting Access to Samba Shares -- SSH Configuration Settings)
Now you want to go back into the Putty configuration. In the "Source port" text box, yes it is small, enter 10.0.0.1:139; but note, the image below only shows 0.0.1:139 because it has scrolled to the left. Also, enter 192.168.0.66:139 for the destination address. When done, click "Add".

The completed entry should look like the following:

You can repeat the same procedure above for more samba shares, if you want. Although not shown, the same procedure is used for 10.0.0.2:139; but, it will have a destination of 192.168.0.8. Again, there are two samba shares in the network diagram.
Step 8: (Getting Access to Samba Shares -- View It)
To view the samba share, click Start/Run and type in \\10.0.0.1\

Special Note
You will probably have to reboot. Also, read and download the following patch from Microsoft.
Also, disable File and Printer Sharing for Microsoft Networks for both adapters.
Disable NetBIOS over TCP/IP; but, make sure LMHosts Lookup is enabled.
DOWNLOADS
OpenSSHhttp://souptonuts.sourceforge.net/sshtips.htm
www.openssh.org
PuTTY
http://www.chiark.greenend.org.uk/~sgtatham/putty/download.html

Tidak ada komentar:
Posting Komentar